Friday, January 1, 2010

Failure and new beginnings

Today was supposed to be the day that I made my final soup of the year - my final soup of 2009, a kickoff to the new year and the new decade. But ladies and gents, I failed miserably. Being short on cash, short on time, short with my family and boyfriend were all the greatest de-motivators one can imagine. With every random soup I made, I found myself sad that I wasn't taking pictures and thinking of how I could write the recipe in an interesting way. So, I admit it. I gave up. I got lazy, I got tired, and I got depressed to a point where soup and good food were simply not interesting at all.

So, now, my resolve is this:

For the entirety of 2010, I will start over. I will make a new pot of soup each week for the year. If I repeat any soups in 2010 that I made in 2009, they will be changed - a vegetarian soup will be made with meat or a meaty soup made vegetarian, or I'll try something new to spice up the original recipe. I will continue, no matter what. I will start again and again if one week I fail and feel like giving up for the entire year, as I did in 2009.

This year will be different.

I wasn't prepared for such a new resolve, but it was only yesterday that I remembered how therapeutic cooking is for me, and how much joy it gives me to think about delicious dishes and to prepare them with my own hands and wit.

Tonight, I'm making Menudo, as is my custom. Nothing about the age-old recipe will be changed, and for tonight, my family and I can enjoy what is tried and true and familiar. But next week? Or a few days from now? We'll be treated to something new. I'm already cooking up a plan, and it involves a sad little acorn squash that has lain uncooked since Thanksgiving.

Ladies and gents, if you could hear my thoughts, you'd hear only a wicked little cackle. I'm back.


Sunday, March 1, 2009

Italian Wedding Soup

No, Italians don't eat this soup at weddings. Also known as "minestra maritata ", or "married soup", this soup is thus named because of the wonderful way that heavy meats blend and "marry" with greens and tomatoes. This soup is my brag soup. I've tweaked it and combined different varieties of minestra maritata that I've tried to make what I make, and I love it.

The challenges I faced with this pot included:

PORTION CONTROL. I've said it a hundred times. I can cook for 50 with ease but I struggle with feeding five. I ordinarily make this soup in a giant stockpot - the kind that old Mexican ladies steam tamales in and that witches can boil small children in. Its a huge, huge pot and my wonderful soup is frequently wasted or pawned off on friends and extended family in tupperwares because there is simply too much soup.

DIFFERENT INGREDIENTS. I make this soup in the heat of the summer with the freshest ingredients. Fresh homemade stock, perfect homegrown tomatoes, fresh corn scraped off of the cob, onions that still have dirt on them, and fresh, beautiful, tender greens that wilt into tasty oblivion in the soup. Alas, the bug hit me to make my wedding soup in early March, when the fresh tomatoes are orange-yellow at best, the corn is a little moldy and $1.50 an ear, the onions are tough and large from being stored, and the greens are frozen. I know some people scoff at the idea of not using the freshest, most in-season veggies. I must admit - this version of my soup is not for you, but its tasty and when handled well, less desireable vegetation can be delicious.

In a few months, I'll make this soup again. No, I won't consider it a repeat that goes against my challenge of unique pots of soup. Why? Using fresh ingredients will change the soup dramatically and requires different prep. Simple enough.

What You'll Need
1.5 pounds ground beef
two 24 ounce cans whole peeled tomatoes
one 16 ounce bag frozen sweet corn
one package frozen spinach, chopped
one half medium onion OR
three green grilling onions
6 oz package of orzo or small pasta
one egg
1/3 cup bread crumbs
garlic paste
garlic powder
white pepper
paprika
Italian seasoning mix (oregano, basil, thyme, rosemary)
salt
butter or extra virgin olive oil


I prefer 85% lean/15% fat meat for this soup, but you can go as far as 90% lean. Any leaner, and the meatballs will lack flavor and won't stick together as well.

Buy the best canned tomatoes you can afford. The one can of brand-name organic tomatoes I had was of much, much greater quality than the can of local-store generic.

By "grilling onions", I mean small, inch-wide onions with green stalks. Here in Texas, we grill them with BBQ. Do you call them something different..?

The orzo/small pasta may be substituted for cooked barley or rice. Its especially tasty with barley.

The How-To

Begin with your meat. Sprinkle with salt and spices to taste. 1/4 teaspoon of each will do if you like plain meatballs; I usually add much more. At least a teaspoon of each.

Garlic paste is my favorite thing in the world. I buy it at a local arabic grocery. Its quite cheap, lasts forever in the fridge (if you don't eat it right away..) and its very convenient. I still love fresh garlic and use it to my heart's content, but garlic paste has earned a special place in my kitchen. I added about one tablespoon to my meatball mix.


The mix before mixing: the egg is nestled in the meat, with 1/2 cup of bread crumbs, at least a teaspoon of white pepper (hold your nose and prepare to sneeze..), a half teaspoon of paprika and the other spices.

Mash thuroughly. Consider adding another egg if your mix is dry or if you use leaner meat.


Prepare your pot: add a splash of oil or enough butter to coat the bottom and throw in halved green onions (or diced regular onion). Some minced fresh garlic or a bit of garlic paste also go nicely.


Form the meat into small, 3/4-inch-wide balls and brown. Its just occured to me that I could bake the meatballs instead..so feel free to try that as well (be sure to deglaze and retrieve the juices for the soup!).

Pardon the steam clouding the image! When the meat is good and brown, use a half shotglass of water to deglaze the bottom of the pot. Better yet..use liquor!

Just cover the meatballs with beef stock. You do not need very much stock yet.

Add one can of tomatoes. Mash the whole tomatoes before dropping them in (and watch out for squirts of tomato juice! They're like balloons!). Increase the heat to medium-high, and let the small amount of stock, meatballs, and tomatoes simmer for 5-10 minutes to let the flavors "marry".

When the meatballs and first tomatoes are finished "marrying", lower the heat, add the second can of tomatoes, and the package of defrosted spinach. I split the two cans into separate cook times, as I do with fresh tomatoes in this recipe - the first can of tomatoes "marries" into the soup and kind of disintegrates during cooking, but the second can of tomatoes remains fleshy and juicy to be eaten as a chunky vegetable in the soup.


Add more stock - approximately the same amount you added to the meatballs. Note the chunks of tomatoes, just added to the mix, and the reddish color of the broth because of the first tomatoes added. Add more paprika to taste - I like this soup to be spicy and add at least a tablespoon of the stuff at this step.


Finally..add the corn! Bring the soup to a simmer once again, and add the orzo or pasta. The orzo will cook within 5 minutes (it is very small). Remove from heat immediately - you do not want the orzo to turn to mush!

If you have it handy, add a few handfuls of fresh spinach before serving. When reheating leftovers, do not allow the pot to boil. Preferably, reheat only what you plan to eat, since multiple reheats will make the pasta or grain turn mushy.

Enjoy!

Friday, February 20, 2009

Roasted Beef Stock

I guess you can tell that I like to make stock. Since I've already gone into it, I suppose I don't need to go into more detail about stock lore and the wonders of boiled bones. I was recently in the mood for a nice beefy soup, so when I saw beautiful, thick beef knuckles on sale for .79c a pound, I had to give in.

I've been appalled lately at the sight of soup bones on sale for upwards of $5 a pound. Nope, not organic beef bones. Not veal bones or buffalo. I'm talking about plain beef knuckles and oxtails. Folks - don't throw your money away. What you're being sold is practically offal. You could buy yourself some nice steak for the price of these bones, so don't be fooled by supermarkets trying to make a buck. Go to places that have actual butchers on site, and you'll find bones at a better cost. I never pay more than $2-3 a pound for soup bones - and that is only if they're especially fresh and meaty.

As I've said before - beef knuckles are some of my favorite soup bones. Cows are big, heavy animals - and their knees require plenty of cartilage to support their weight. This cartilage is gold when it comes to stock. As you'll see, with plenty of slow simmering, that cartilage will give way to wonderful, super gelatinous stock. I also enjoy using oxtails. Oxtails are exactly what the sound like - beef tails. The small vertebrae in this cut of meat is full of marrow, and the more delicate nature of those bones makes them more easily broken down and dissolved into their mineral constituents. They also have plenty of cartilage, and the meat tends to be less fatty than the knuckles.

Leftover bones can also be used, but I personally don't have much experience with this. Most beef made in my home is boneless, and I think if I tried to store away more bones in my family's freezer, my mother would store MY bones in the freezer (hopefully next to the ice cream..). I digress.

What You'll Need
5-8 pounds of beef soup bones
1 large onion, sliced
1 carrot
2 leek tops
celery stalk
1 garlic clove
1 shot glass of sherry, wine, or liquor

The How-To

Preheat oven to 375-400F

Place the bones on a lightly greased baking pan. In order to make the stock brown and rich, the bones need to be roasted. Arrange the bones and meat in a single layer for even browning. Sprinkle with sea salt. Even if you don't plan to salt your stock later, add a little salt now. I wish I knew why, but the salt seems to make the bones and meat brown better and makes the stock taste less bland. I find no difference in the saltiness of the finished product, if no more salt is added later - I've just noticed that the salted bones stock has a deeper taste.

Arrange the sliced onions over the meat and bones. While I was still learning the ropes of making beef stock, I learned quickly that roasted onions taste MUCH better in the finished product. They also lend flavor to the meat.

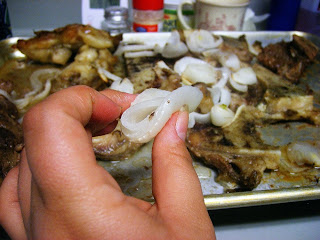
Don't trim the meat! Roasting will melt off a good deal of the fat. You don't want to risk losing precious connective tissue - like the tendon I'm holding here - which adds so much texture to the stock.

Pop the pan in the oven, and allow the meat to brown on one side for about 25 minutes.

After about 25 minutes, flip the bones and meat over. Note that some parts of the bones are still bloody - this is OK! The bloody parts will continue to cook even when flipped over.

This is what the bones should look like when finished: dark tan with dark brown parts, with dark brown juicy meat.

The onions, which will go into the stockpot with the meat and bones, should be soft and just a little brown on the edges.


After draining the fat into a gravy separator, use a shotglass full of liquor, wine, or sherry to deglaze the drippings from the pan.

What I like to do is to add the liquor, pop the pan back into the oven for two or three minutes to heat it up, and then to use a brush to scrape up all of the parts stuck to the pan. These drippings are really, really flavorful and its awful to let it go down the drain with the dishsoap when it could be in the stock pot!

The bones I got were not very fatty at all. This creamer contains all of the fat from the entire pan. Someone should really make a miniature shotglass-sized gravy separator! After letting the layers settle, I drained the fat very slowly and put the dark brown drippings on the bottom into the stock pot.

As seen in my Roasted Chicken Stock tutorial, I save the tough, barely-edible green stems from my leeks to use in stock. Leeks are huge, and only a third at most of them is tender and tasty to eat as a side dish - put the rest to good use!

Ugh, celery. I dislike celery in chicken stock because I feel that it easily overpowers the chicken flavor, but I must admit that it's necessary in beef stock. I usually only use a single stock; in this case, I used a half-eaten core of celery from the bottom of the fridge. It was old, no longer perfectly crisp and good for eating alone - but the flavor was fine for stock.

Like with the celery, I use past-prime carrots in stock. This carrot was long forgotton in the crisper, was especially bendy with cracked skin..but its still a carrot, and its still useful for stock. I slice them vertically and throw them in.

Cover the meat with a few inches of water; its all right if the veggies poke out, especially if you're lazy like me and do not chop your veggies when making stock. Set the stove on medium-low, start to simmer, and leave it alone. Skim scum as needed.

Unfortunately..this is the only progress picture I have. I let this stock simmer for 36 hours -a habit I'll have to keep, since this stock turned out wonderfully. I didn't mean to do this, but I happened to be right in the middle of the school week from Hell, peppered with all-nighters, science papers, and crying over chemical calculations gone wrong. I admit it: I forgot about my stock, and its probably the best thing I've ever unintentionally done in the kitchen.

At the end of Hell Week, I put the pot (bones, veggies, fat and all) into the fridge before falling asleep for 15 hours. I woke up to this: completely solid, gelatinous, deep brown stock. Not too much fat. Plenty of flavor.

If you let the stock gel in the fridge, heat it slightly to make it liquid again. Remove the largest bones first...

...and pour the rest through a corander into a new pot.

The rough product will probably look like this - dark brown, a little cloudy, with tiny globules of fat and cooked cartilage floating.

The vegetable matter strained out of the stock is compostible if you give it a quick rinse to get rid of any excess beefy-ness that may attract pests.

Run the stock through a large-mesh strainer. The mush you'll catch will mostly contain vegetable mush with a little meat and grit (from the cooked, softened bones). This is why you should never give your pet cooked bones - just taste the mush. It'll taste sandy from all of the grit that your pet could choke on.

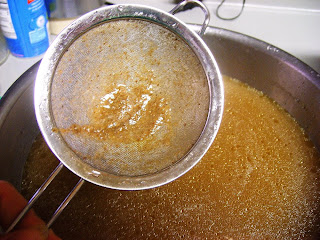
Follow with a run through a finer strainer. This strainer will catch finer grit and bits of fat. Allow the stock to cool at room temperature.

The bones, after being well-simmered for stock, will feel almost spongy. The cartilage - once firm and rubbery - should mush and mold under a fingernail with the consistency of silly putty.

I like to separate the meat from the bones, cooked connective tissue (now quite soft and edible), and cartilage. Its soft, tender meat - well put to use in a beef barley soup or in a pot pie.

After cooling the stock, use the fine strainer to scoop out the layer of fat that will form on top of the stock. Beef stock tends to be much fattier than chicken stock; take care to remove as much as possible.

Store in the fridge for up to five days, or place in airtight freezer containers and store in the freezer.

Enjoy!

Wednesday, February 11, 2009

Cream of Mushroom Soup For Two (or three..)

LOOK AT THIS WASTE:

One week later, come new-soup-making time, I was crushed to realize that at least a third of my precious split pea sweet potato soup was still in the fridge. My family is officially sick of soup, and my dear boyfriend C was (un)kind enough to remind me that I was not working very hard at one of my original goals: to make less soup. Less quantity, that is. Its true: I can very easily cook for a dozen or more, but I have troubles when my number of servings dwindle below 5 or 6. This was also a very busy week for me (I work and attend school full time - I'm a few semesters shy of degrees in biochemistry and multidisciplinary sciences. Let's just say that 15 hours of upper division science classes is tough.) So, I decided to see what I had on hand see what small quantity of high-quality soup I could make.

Our fridge was unfortunately lacking, though. I had plenty of cooked chicken but very little stock. Heads of cauliflower, broccoli, and cabbage. Radish greens. Radishes. Condiments. 6 boxes of tofu. Six large button mushrooms. Olive salad from New Orlean's historic central market (my favorite thing ever, and I savor it whenever someone I know passes through New Orleans and buys me a few jars).

What to do?! I was near giving up when I remembered my goal: Less Soup! I figured I could easily stretch my six button mushrooms into a dainty cream of mushroom soup for two.

I was disappointed to read that the common table button mushroom, Agaricus bisporus, is really just an immature Portobello mushroom! I've never been much of a mycologist beyond knowing a few local edible mushrooms, but the idea that petite, cute little buttons could become huge, meaty mushrooms led me to check out several library books, of which the fruits you shall see in a few weeks when I make a more elaborate mushroom -something- post. For today, however, all I have to offer is this: delicious, delicate, creamy mushroom soup for two (or three...I'm trying, I'm trying!!)

What You'll Need
1.5 cups sliced button mushrooms
1/3 cup diced white onion
1 garlic clove, mashed
2 tablespoons butter AND/OR
Extra virgin olive oil
1.5 cups chicken broth *v
2 cups heavy cream *v
1 tablespoon corn starch, dissolved in 1/3 cup cold water
1 bay leaf
salt


Portobello mushrooms will do fine in place of button mushrooms. The soup will be "meatier" but the taste is similar. Use fresh mushrooms - dried mushrooms have a funny texture when reconstituted, and canned/jarred always taste pickle-y to me, even if the mushrooms are not pickled or marinated in vinegar.

If veganizing, use a mild vegetable broth that does not taste heavily of celery. Instead of heavy cream, I'd try unsweetened soymilk mixed with roux.

The How-To

With the bottom of your chef's knife, smash the garlic out of its skin with the heel of your palm (be careful not to cut yourself!). After removing the skin, smash the garlic a little more and chop it so that its not just one large piece of garlic mush.

In a nutshell: dice your onions and slice your mushrooms. I prefer chunky mushroom soup, with plenty of bite-sized mushroom pieces, but feel free to dice the mushrooms or run them through a food processor. If you decide to go with smaller mushroom pieces, reduce the time that you saute them.


Lightly brown the onions in olive oil or butter over medium heat. When the onions are just browned and turning translucent:

..add the mushrooms! I suggested using butter because I personally prefer the way mushrooms taste when they soak in butter while cooking. I cooked my onions in olive oil, then added a pat of butter before adding the mushrooms. Adding olive oil will afford you a little burn-resistance against burning your butter, but still keep an eye on the butter for over-heating and browning.

Add your bay leaf right now!

When the mushrooms are soft, add the chicken stock. I let the small amount of stock and mushrooms simmer for a few minutes, to let the flavors mix. I also added a small amount of salt at this time.

Add the cream! Lower the heat to "low" - the cream can and will burn.

Prepare the corn starch in cold water (the water MUST be cold in order for the corn starch to dissolve; DO NOT try to add corn starch straight to your soup! You WILL end up with lumps of mushy, pasty corn starch in your soup). When mixed, add to the pot.

Mix well, heat thuroughly, salt to taste. The soup is done!

I served my soup for two (or three) with chicken, cauliflower casserole, and radish greens with mineral water (San Pellegrino? Psh. I can out-burp you with Topo Chico Agua Mineral any day of the week!). It went with the meal deliciously.

It could have gone well on its own, as my father ate it (his serving was that blasted third serving - two cups of soup beyond my goal of mushroom soup for two). Oh well. The more soup, the merrier and at the end of the day, my family was wishing I'd made gallons for everyone to share and enjoy. You can never win >:(

Enjoy!

Tuesday, February 3, 2009

Vegan Yellow Split Pea and Sweet Potato Soup

Peas. Who likes them? They taste "green", pop in your mouth when eaten fresh, look like baby food (and poop..) when cooked and mashed, and they comprise a large part of high school biology thanks to the father of modern genetics, Gregor Mendel, with his 29,000 pea plants. Peas seem to be a food with no happy medium - you love them in any form, or you hate even the sight of them.

I personally don't understand all of the hate. I love everything Pea. Their color, their smells, the flavor. They're cute - perfectly round and soft in their cozy pods. They're pretty, with vibrant, viney plants that produce petite, unique little flowers. They're good for you, too - a mere 100g of fresh steamed peas has over 5 grams of fiber, plenty of vitamin A and B vitamins and vitamin C, and a healthy serving of many important bio-available minerals such as Phosphorus, Zinc, Magnesium, and Iron (a local restaurant with outstanding split-pea soup recommends their soup for anemics!)

Before the 1600's, when eating fresh, immature green peas was "both a fashion and a madness", peas were grown for their dried seeds across Europe and the Mediterranean region. With the modern abundance of canned, frozen, and fresh peas, the humble, cheap, dried pea is often overlooked as too fickle and difficult to deal with. Nowadays you'll most commonly see dried peas sold split to decrease cooking time, and most often you'll find split peas made into various soups.

Every European and North American culture has its own idea of what split pea soup should be. Most uniquely (in my opinion): Australian split pea soup is traditionally served as a "Pie Floater" - with a whole, small meat pie floating in the soup. One of the first processed, ready-to-prepare foods was instant pea soup in a tube/sausage, created in 1867:

Almost universally, pea soup involves ham, salt pork, or sausage. I have not had pea soup in years - since I stopped eating pork. When I set myself up to make split pea soup as part of my 52-Pots-of-Soup challenge, I figured since I was forgoing the pork, I'd go ahead and make the soup vegan as well.

I found beautiful organic yellow split peas at a local market, and was completely enchanted with their color and how fresh they looked compared to the crumbly old green split peas. Incorrectly, I assumed that the yellow peas might be a little sweeter, too- an attribute I was after, since I needed a little something special to make up for the lack of pork (yellow peas, in fact, are not sweeter than green peas; the change seems purely cosmetic). When I thought of throwing in a sweet potato (left over from the unholy amount I bought and stored at Thanksgiving, months ago..), I was a bit disappointed to see that it'd already been done but I was delighted to see how delicious it looked. I was hooked.

What You'll Need

2 cups yellow split peas
1 large sweet potato (preferably an orange variety)
one-half large onion, diced
ground cumin
fresh ginger, grated (1 tablespoon)
nutmeg
cinnamon
salt
white pepper
water or vegetable stock (about 2 quarts)
olive oil
smart balance/earth balance margarine


Yellow split peas are common in health food stores. Green peas may be substituted, but the color of the end product may not be very appetizing (green + orange = ??yuck??). I chose a common Beuregarde orange sweet potato because I think they're sweeter than the random-variety yellow-fleshed varieties I find where I live, but I gander that a light sweet potato could go well with green peas to avoid nasty-looking soup.

I couldn't remember which version - smart or earth - was vegan and since I used the last of it in the house, I also can't remember which version we had when I cooked this a few days ago!

The How-To

Start by peeling the sweet potato. Trim off any eyes or dents, and slice into half-inch-wide slices. Then chop each slice into halves or thirds.

Rinse and sort the peas. Remove any brown peas or floating peas or pea-plant-parts. Drain, and place in the pot with the sweet potatoes.

Before covering with water, add about a quarter teaspoon of cumin, a quarter teaspoon of salt, and a quarter teaspoon of white pepper. I also chose to add a tablespoon of sugar.


Cover the peas with about one inch of water (the potatoes will float).

Set the oven to moderate heat, cover the pot, and allow the peas and potatoes to simmer. This picture was taken after about 30 minutes - the potatoes are edibly tender, and the peas have the texture of raw, mature beans (in other words: they're still pretty darn hard). They've absorbed water, though, and have expanded. Those green bits are a few wayward green split peas that fell in..

Stir the concoction occasionally to avoid burning. Add water as needed to keep the potatoes just covered.

After one hour. The potatos are soft, and the peas are the texture of cooked pinto beans. Turn off the heat, and allow it all to cool and absorb more water.

Add more water if necessary - with these, the peas were remarkably thick, with the consistency of refried beans. There is no way I could have called this "soup"!

Carmelize the onions: dice the onions, heat olive oil on medium-low heat, and cook the onions slowly. Toss the onions frequently enough to avoid excessive browning. Add a teaspoon of sugar if you used a white onion or a particularly strong onion. Good carmelized onions should be transparent-brown, savory, and should not have any burned or stiff bits. It should take about 30 minutes to carmelize a half onion.

I chose to make the onions separately because 1.) I thought adding carmelized onions to the soft peas and potatoes would impart more flavor than cooking the peas and potatos in water poured over already-carmelized onions and 2.) I forgot. It ended up working well!


Add the carmelized onions to the soup and blend. If using a conventional blender: ONLY fill the pitcher half-full to avoid splattering and burns.

The finished product should be smooth, creamy, and thick. "Thick as pea soup" doens't even begin to describe how thick this soup ended up being. I enjoyed it, but if you prefer a lighter soup, feel free to add a bit of water, stock, or (soy) milk to thin it out.

But, if you're like me, you like thick soup. Truly amazing pea soup can hold a spoon upright! (OK, I cheated - the soup pictured is chilled, but its still an amazing feat!)

I have no final picture of my pea soup, because my nephew and little helper ended up proving to be a distraction. I was tickled with disbelief when I read an old book that said "Children seldom disagree with pea soup, and it seldom disagrees with them" - but indeed, that line held true, as my nephew thoroughly enjoyed six whole spoonfuls before deciding that playing with pea soup is more fun than eating it.

I liked this soup a lot. Its certainly different from the thicker, fattier pea soups I grew up on - rich with salt pork and bacon grease - but it made for a good replacement and a healthy meal.